Intro
Gherkin is a language still used in many test automation frameworks. Sometimes it is because the client requires us to use it, sometimes it is because the team decides to do so.
To be honest, it was not love at first sight for me. I personally have a pretty long journey with Gherkin– from liking it at first, through detesting the language for a while, and then ending up liking it again. In this article I will present the most important Cucumber features together with Java implementation.
Here are all Cucumber features covered in this article:
| Feature | Description |
|---|---|
| Scenario | Simple scenario |
| Scenario Outline | Requires user to provide test data in the “Examples” section |
| Data Tables | Requires user to provide test data for test step |
| Scenario Context | Sharing of values between test steps |
| Cucumber Data Types | Data types handled by cucumber |
| Cucumber Regular Expression | Usage of regular expression in cucumber scenarios |
| Cucumber hooks | Executes additional code in test scenarios |
Feature file
First of all, what is a feature file? In the technical world a non-technical approach was created to allow non-technical people to cooperate with the team during the development of an app. The Gherkin language was created as an additional layer in the BDD approach. The Gherkin tests are located in the so-called feature files which are glued with the code (Java, Kotlin, C# etc.). Usually Gherkin is very easy to use, and requires minimum programming knowledge, but there are features which require some coding.
Let's start with something easy.
Scenario
Here’s the most basic and easiest to use example of the Cucumber test:
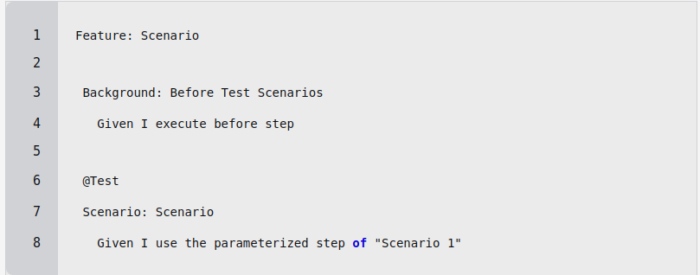
Code Block 1. Scenario
Code Block 1. contains a few things to be explained:
- Feature: the title of feature file
- Background: the keyword that allows the user to execute test steps before each test scenario defined in the feature file
- @Test: Tag which tells the testing framework what test scenario should be executed. “Test” is defined by the user. We can use e.g. “@SmokeTest”
- Scenario: Test scenario name
Gherkin tests use [Given, When, Then, But] keywords before each test step. In our only test step, except the Background step, we use a parameter in which we pass the value “Scenario 1”.
Now, let’s see what the glued Java code looks like:
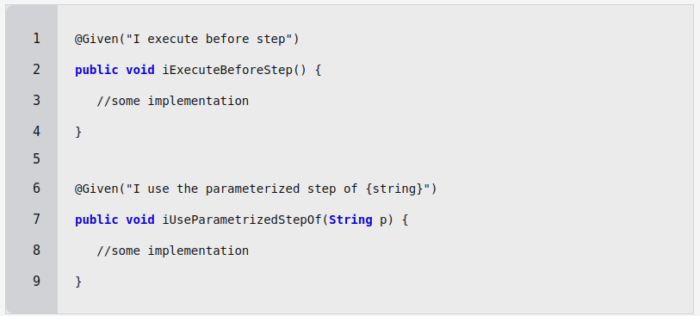
Code Block 2. Java code implementation of Scenario
Scenario Outline
Let’s do something more complex:
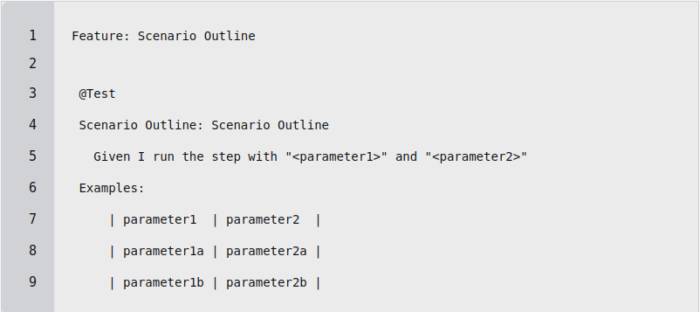
Code Block 3. Scenario Outline
This time we will use the Scenario Outline which allows us to repeat test scenarios with different test data configurations. Code Block 3. contains few things to be explained:
- Examples: the matrix of test data to be used by test scenarios. The first row is a header with parameter names.
And java implementation:

Code Block 4. Java implementation of Scenario Outline
Data Table
The Scenario Outline is very useful, but what if we don’t want to repeat the entire test scenario but just one test step? Gherkin has a way to do that and it is called “Data Table”.
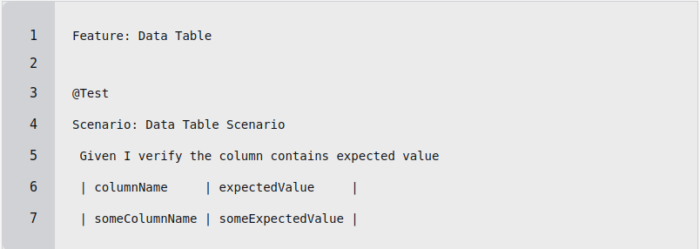
Code Block 5. Data Table
The Scenario with Data Table does not differ much from the Scenario Outline. The only thing is that we do not put the “Examples” keyword before the table.
The Java implementation looks a bit more complex than in the previous cases:
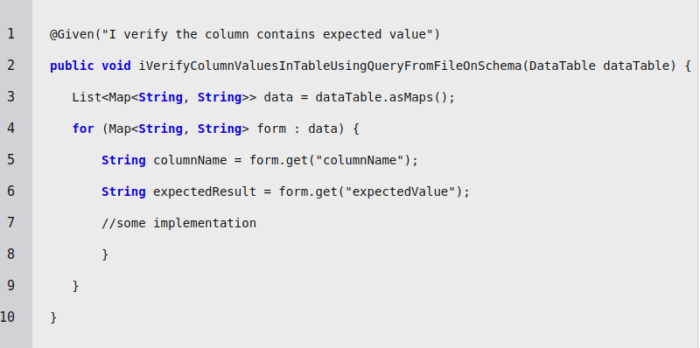
Code Block 6. Java implementation of Data Table
To access data from a data table, we create a special variable dataTable of a “DataTable” type. All data will be stored in the List variable.
Scenario Context
Using the Scenario Context we can share data between steps. Let’s assume we have a two steps scenario in which we want to pass value “data” from step 1 to step 2 (Code Block 7).

Code Block 7. Scenario Context
Firstly we need to build a special class called ScenarioContext with scenario context features of setting and getting data (Code Block 8). Our scenario context is a HashMap with a key-value pair. We will be identifying values by its key.
- scenarioContext(): HashMap of key-value pair
- setContext(): key-value method to store scenario context data
- getContext(): method to get data providing key
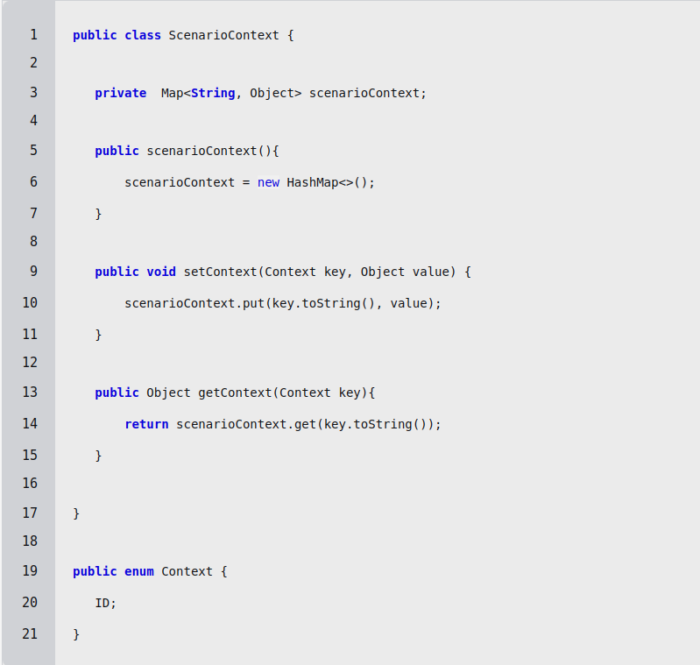
Code Block 8. Java implementation of Scenario Context class
Having this we can make use of implemented methods. In step 1 we then set the value in the scenario context and in step 2 we get the value (Code Block 9).
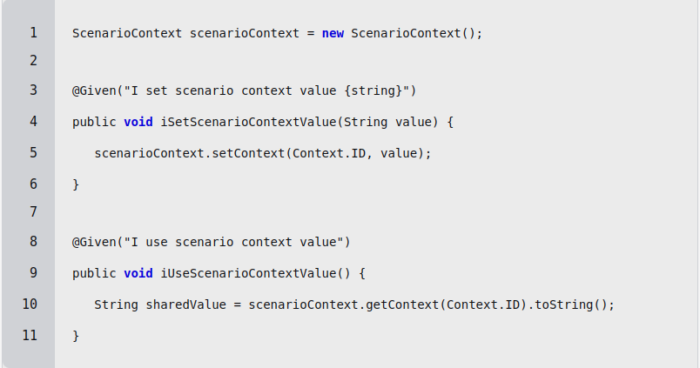
Code Block 9. Scenario Context steps
Cucumber Data Types
Cucumber handles a limited number of data types. We can define strings, integers and float values but in the case of boolean values we need to code some workarounds.

Code Block 10. Cucumber Data Types
The Java code would look something like this:

Code Block 11. Java implementation of Cucumber Data Types
Cucumber Regular Expression
This is another frequently used feature. Code Block 12 shows a two steps scenario which differ only by using different variable values (var1 and var2). This is in fact just one step, and in the Java code (Code Block 13) we define only one method but with regex and one parameter var.

Code Block 12. Regular Expression in Cucumber
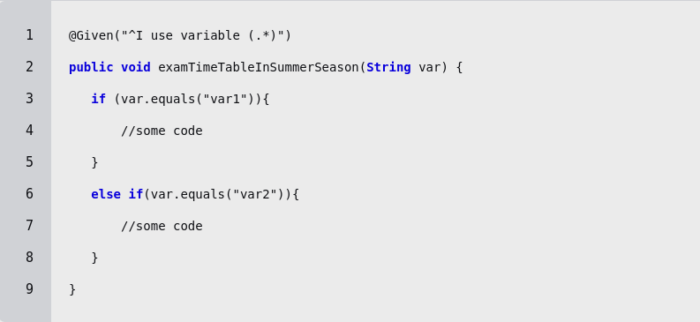
Code Block 13. Java implementation of Cucumber regular expression
Cucumber Hooks
Last but not least: Cucumber hooks.
Code block 14 presents the 4 most important hooks:
- @Before: Executes code before each test scenario
- @After: Executes code after each test scenario
- @BeforeStep: Executes code before each test step
- @AfterStep: Executes code after each test step
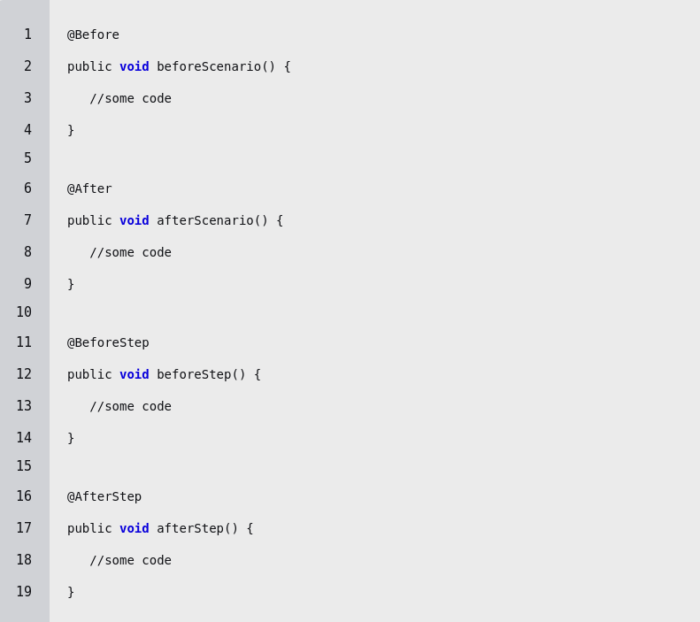
Code Block 14. Cucumber Hooks
Summary
I hope I convinced you to use Gherkin in your tests. These few features will make your tests more readable and easier to understand by non-technical people. Also for new joiners it will be easier to understand the business logic and decrease their time to onboard.


