In the ever-evolving landscape of technology, companies must adapt to the winds of change to stay relevant and competitive. One such transformation that has taken the tech world by storm is the transition from Intel x86_64 architecture to iOS ARM architecture, exemplified by Apple's groundbreaking Apple M1 chip. In this context, CI systems for iOS have become a crucial consideration for companies navigating this shift, ensuring that software development and testing processes remain efficient and up-to-date with the latest technological standards.
Apple announced its M1 chips almost three years ago, and since then, it has been clear that the company would embrace the ARM architecture and eventually drop support for Intel-based software. To maintain compatibility between architectures, Apple has introduced a new version of Rosetta, its proprietary binary translation framework, which has proven reliable in the past during the significant architecture transformation from PowerPC to Intel in 2006. The transformation is still ongoing, and we have seen Xcode lose its Rosetta support in version 14.3.
At Miquido, we recognized the need to migrate from Intel to ARM a few years ago. We started preparations in the middle of 2021. As a software house with multiple clients, apps, and projects ongoing concurrently, we faced a few challenges that we had to overcome. This article can be your how-to guide if your company faces similar situations. Described situations and solutions are depicted from an iOS development perspective - but you may find insights suitable for other technologies, too.A critical component of our transition strategy involved ensuring our CI system for iOS was fully optimized for the new architecture, highlighting the importance of CI systems for iOS in maintaining efficient workflows and high-quality outputs amidst such a significant change.
The Problem: Intel To iOS ARM Architecture Migration
The migration process was divided into two main branches.
1. Replacing the existing Intel-based developers' computers with new M1 Macbooks
This process was supposed to be relatively simple. We established a policy to gradually replace all the developer's Intel Macbooks over two years. At present, 95% of our employees are using ARM-based Macbooks.
However, we encountered some unexpected challenges during this process. In the middle of 2021, a shortage of M1 Macs slowed down our replacement process. By the end of 2021, we had only been able to replace a handful of Macbooks out of the almost 200 waiting ones. We estimated that it would take around two years to fully replace all the company's Intel Macs with M1 Macbooks, including non-iOS engineers.
Fortunately, Apple released their new M1 Pro and M2 chips. As a result, we have shifted our focus from replacing Intels with M1 Macs to replacing them with M1 Pro and M2 chips.
Software not ready for the switch caused developers’ frustration
The first engineers who received the new M1 Macbooks had a difficult time as most of the software was not ready to switch to Apple's new iOS ARM architecture. Third-party tools like Rubygems and Cocoapods, which are dependency management tools that rely on many other Rubygems, were the most affected. Some of these tools were not compiled for the iOS ARM architecture then, so most of the software had to be run using Rosetta, causing performance issues and frustration.
However, software creators worked to resolve most of these issues as they arose. The breakthrough moment came with the release of Xcode 14.3, which no longer had Rosetta support. This was a clear signal to all software developers that Apple was pushing for an Intel to iOS ARM architecture migration. This forced most 3rd party software developers who had previously relied on Rosetta to migrate their software to ARM. Nowadays, 99% of the 3rd party software used at Miquido on a daily basis runs without Rosetta.
2. Replacing Miquido’s CI system for iOS
Replacing the continuous integration iOS system at Miquido proved to be a more complicated task than just swapping out machines.First, please take a look at our infrastructure back then:
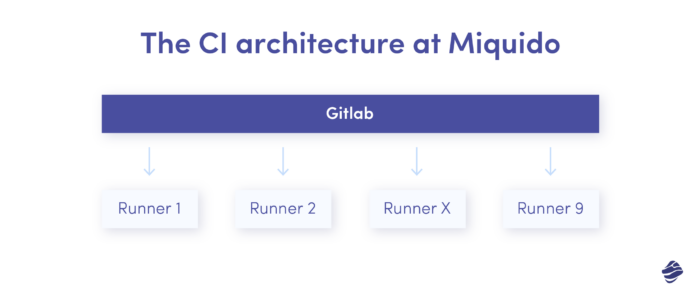
We had a Gitlab cloud instance and 9 Intel-based Mac Minis connected to it. These machines were serving as job runners and Gitlab was responsible for orchestration. Whenever a CI job was queued, Gitlab assigned it to the first available runner that met the project requirements specified in the gitlab-ci.yml file. Gitlab would create a job script containing all the build commands, variables, paths, etc. This script was then moved onto the runner and executed on that machine.
While this setup may seem robust, we faced issues with virtualization due to the poor support of Intel processors. As a result, we decided not to use virtualization such as Docker and execute jobs on the physical machines themselves. We tried to set up an efficient and reliable solution based on Docker, but virtualization limitations such as a lack of GPU acceleration resulted in jobs taking twice as long to execute as on the physical machines. This led to more overhead and rapidly filling up queues.
Due to the macOS SLA, we could only set up two VMs simultaneously. Therefore, we decided to extend the pool of physical runners and set them up to execute Gitlab jobs directly on their operating system. However, this approach also had a few drawbacks.
Challenges in Build Process and Runner Management
- No isolation of the builds outside of the build directory sandbox.
The runner executes every build on a physical machine, which means that the builds are not isolated from the build directory sandbox. This has its advantages and disadvantages. On the one hand, we can use system caches to speed up builds since most projects use the same set of third-party dependencies.
On the other hand, the cache becomes unmaintainable since leftovers from one project can affect every other project. This is particularly important for system-wide caches, as the same runners are used for both Flutter and React Native development. React Native, in particular, requires many dependencies cached through NPM.
- Potential system tool mess.
Although neither job had been executed with sudo privileges, it was still possible for them to access some of the system or user tools, such as Ruby. This posed a potential threat of breaking some of these tools, especially since macOS uses Ruby for some of its legacy software, including some legacy Xcode features. The system version of Ruby is not something that you would want to mess with.
However, introducing rbenv creates another layer of complexity to deal with. It is important to note that Rubygems are installed per Ruby version, and some of these gems require specific versions of Ruby. Almost all of the third-party tools we were using were Ruby dependent, with Cocoapods and Fastlane being the main actors.
- Managing signing identities.
Managing multiple signing identities from various client development accounts can be a challenge when it comes to the system keychains on the runners. The signing identity is a highly sensitive piece of data as it enables us to codesign the application, making it vulnerable to potential threats.
To ensure security, the identities should be sandboxed across projects and protected. However, this process can become a nightmare considering the added complexity introduced by macOS in their keychain implementation.
- Challenges in multi-project environments.
Not all projects were created using the same tools, particularly Xcode. Some projects, especially those in the support phase, were maintained using the last version of Xcode that the project was developed with. This means that if any work was required on those projects, the CI had to be capable of building it. As a result, runners had to support multiple versions of Xcode at the same time, which effectively narrowed down the number of runners available for a particular job.
5. Extra effort required.
Any changes made across the runners, such as software installation, must be performed on all runners simultaneously. Although we had an automation tool for this, it required extra effort to maintain automation scripts.
Customized infrastructure solutions for diverse client needs
Miquido is a software house that works with multiple clients with different needs. We customize our services to meet the specific requirements of each client. We often host the codebase and necessary infrastructure for small businesses or start-ups since they might lack the resources or knowledge to maintain it.
Enterprise clients usually have their own infrastructure to host their projects. However, some have no capacity to do so or are obligated by industry regulations to use their infrastructure. They also prefer not to use any 3rd party SaaS services like Xcode Cloud or Codemagic. Instead, they want a solution that fits their existing architecture.
To accommodate these clients, we often host the projects on our infrastructure or set up the same continuous integration iOS configuration on their infrastructure. However, we take extra care when dealing with sensitive information and files, such as signing identities.
Leveraging Fastlane for efficient build management
Here Fastlane comes as a handy tool. It consists of various modules called actions that help to streamline the process and separate it between different clients. One of these actions, called match, helps to maintain development and production signing identities, as well as provisioning profiles. It also works at the OS level to separate those identities in separate keychains for the build time and performs a cleanup after the build, which is extra helpful because we run all of our builds on physical machines.
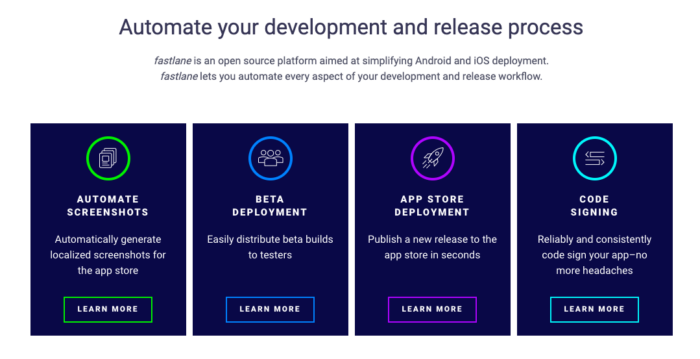
We initially turned to Fastlane for a specific reason, but discovered that it had additional features that could be useful to us.
- Build Upload to Testflight
In the past, AppStoreConnect API was not publicly available for developers. This meant that the only way to upload a build to Testflight was through Xcode or by using Fastlane. Fastlane was a tool that essentially scraped the ASC API and turned it into an action called pilot. However, this method often broke with the next Xcode update. If a developer wanted to upload their build to Testflight using the command line, Fastlane was the best option available.
- Easy Switching Between Xcode Versions
Having more than one Xcode instance on a single machine, it was necessary to select which Xcode to use for the build. Unfortunately, Apple made it inconvenient to switch between Xcode versions – you have to use ‘xcode-select’ to do so, which additionally requires sudo privileges. Fastlane covers that as well.
- Additional Utilities for Developers
Fastlane provides many other useful utilities including versioning and the ability to submit build results to webhooks.
The disadvantages of Fastlane
Adapting Fastlane to our projects was sound and solid, so we went in that direction. We successfully used it for several years. However, over these years, we identified a few problems:
- Fastlane requires Ruby knowledge.
Fastlane is a tool that is written in Ruby, and it requires a good knowledge of Ruby to use it effectively. When there are bugs in your Fastlane configuration or in the tool itself, debugging them using irb or pry can be quite challenging.
- Dependency on numerous gems.
Fastlane itself relies on approximately 70 gems. To mitigate risks of breaking up system Ruby, projects were using local bundler gems. Fetching all of these gems created a lot of time overhead.
- System Ruby and rubygems issues.
As a result, all the issues with system Ruby and rubygems mentioned earlier are also applicable here.
- Redundancy for Flutter projects.
Flutter projects were also forced to use fastlane match just to preserve compatibility with iOS projects and protect runner’s keychains. That was absurdly unnecessary, as Flutter has its own build system built in, and the overhead mentioned earlier was introduced only to manage signing identities and provisioning profiles.
Most of these issues were fixed along the way, but we needed a more robust and reliable solution.
The Idea: Adapting a new, more robust continuous integration tools for iOS
The good news is that Apple has gained full control over its chip architecture and has developed a new virtualization framework for macOS. This framework allows users to create, configure, and run Linux or macOS virtual machines that start quickly and characterize with a native-like performance - and I really do mean native-like.
That looked promising and could be a cornerstone for our new continuous integration tools for iOS. However, it was only a slice of a complete solution. Having a VM management tool, we also needed something that could use that framework in coordination with our Gitlab runners.
Having that, most of our problems regarding poor virtualization performance would become obsolete. It would also let us automatically resolve most of the issues we intended to solve with Fastlane.
Developing a tailored solution for on-demand signing identity management
We had one last problem to solve – signing identity management. We didn't want to use Fastlane for this as it seemed excessive for our needs. Instead, we were looking for a solution that was more tailored to our requirements. Our needs were straightforward: the identity management process had to be done on-demand, exclusively for the build time, without any pre-installed identities on the keychain, and be compatible with any machine it would run on.
The distribution problem and lack of stable AppstoreConnect API became obsolete when Apple released their `altool,` which allowed communication between users and ASC.
So we had an idea and had to find a way to connect those three aspects together:
- Finding a way to utilize Apple’s Virtualization framework.
- Making it work with Gitlab runners.
- Finding a solution for signing identity management across multiple projects and runners.
The Solution: A glimpse into our approach (tools included)
We started searching for solutions to address all the problems mentioned earlier.
- Utilizing Apple’s Virtualization framework.
For the first obstacle, we found a solution quite fast: we came across Cirrus Labs's tart tool. From the first moment, we knew this was going to be our pick.
The most significant advantages of using the tart tool offered by Cirrus Lab are:
- The possibility of creating vms from raw .ipsw images.
- The possibility of creating vms using pre-packed templates (with some utility tools installed, like brew or Xcode), available on Cirrus Labs GitHub page.
- Tart tool utilizes packer for dynamic image building support.
- Tart tool supports both Linux & MacOS images.
- The tool utilizes an outstanding feature of the APFS file system that enables the duplication of files without actually reserving disk space for them. This way, you don't need to allocate disk space for 3 times the original image size. You only need enough disk space for the original image, while the clone occupies only the space that is a difference between it and the original image. This is incredibly helpful, especially since macOS images tend to be quite large.
For instance, an operational macOS Ventura image with Xcode and other utilities installed requires a minimum of 60GBs of disk space. In normal circumstances, an image and two of its clones would take up to 180GBs of disk space, which is a significant amount. And this is just the beginning, as you may want to have more than one original image or install multiple Xcode versions on a single VM, which would further increase the size.
- The tool allows for IP address management for original and cloned VMs, allowing SSH access to VMs.
- The ability to cross-mount directories between host machine and VMs.
- The tool is user-friendly, and has a very simple CLI.
There is hardly anything that this tool lacks in terms of utilizing it for VM management. Hardly anything, except for one thing: although promising, the packer plugin to build images on the fly was excessively time-consuming, so we decided not to use that.
We tried tart, and it worked fantastically. Its performance was native-like, and management was easy.
Having successfully integrated tart with impressive results, we next focused on addressing other challenges.
- Finding a way to combine tart with Gitlab runners.
After resolving the first issue, we faced the question of how to combine tart with Gitlab runners.
Let's start by describing what Gitlab runners actually do:
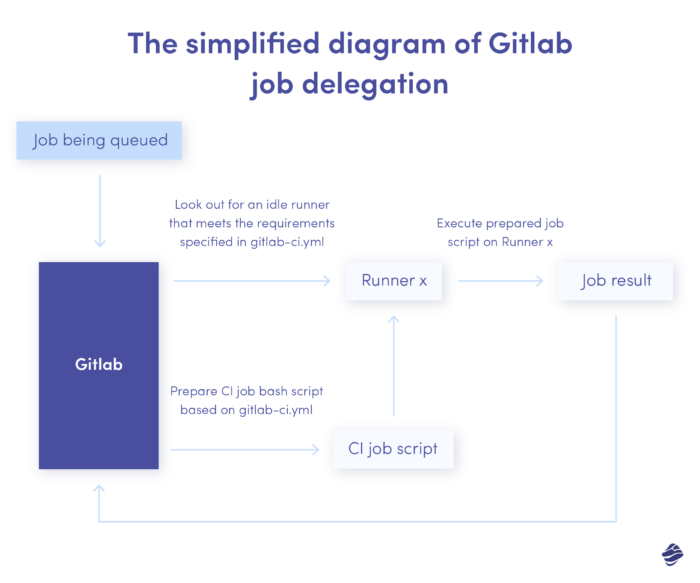
We needed to include an extra puzzle to the diagram, which involved allocating tasks from the runner host to the VM. The GitLab job is a shell script that holds crucial variables, PATH entries, and commands.
Our objective was to transfer this script to the VM and run it.
However, this task proved to be more challenging than we initially thought.
The runner
Standard Gitlab runner executors such as Docker or SSH are simple to set up and require little to no configuration. However, we needed greater control over the configuration, which led us to explore custom executors provided by GitLab.
Custom executors are a great option for non-standard configurations as each runner step (prepare, execute, cleanup) is described in the form of a shell script. The only thing missing was a command line tool that could perform the tasks we needed and be executed in runner configuration scripts.
Currently, there are a couple of tools available that do exactly that - for example, the CirrusLabs Gitlab tart executor. This tool is precisely what we were looking for at the time. However, it did not exist yet, and after conducting research, we did not find any tool that could help us accomplish our task.
Writing the own solution
Since we couldn't find a perfect solution, we wrote one ourselves. We're engineers, after all! The idea seemed solid, and we had all the necessary tools, so we proceeded with development.
We have chosen to use Swift and a couple of open-source libraries provided by Apple: Swift Argument Parser to handle command line execution and Swift NIO to handle SSH connection with VMs. We began development, and in a couple of days, we obtained the first working prototype of a tool that eventually evolved into MQVMRunner.
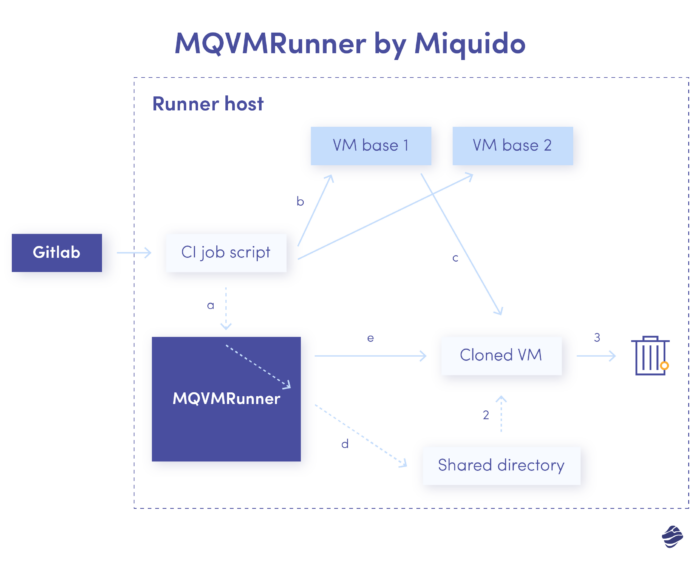
At a high level, the tool works as follows:
- (Prepare step)
- Read the variables provided in gitlab-ci.yml (image name and additional variables).
- Pick the requested VM base
- Clone the requested VM base.
- Set up a cross-mounted directory and copy the Gitlab job script into, setting necessary permissions for it.
- Run the clone and check the SSH connection.
- Set up any required dependencies (like Xcode version), if required.
- (Execute step)
- Run the Gitlab job executing a script from a cross-mounted directory on a prepared VM clone through SSH.
- (Cleanup step)
- Delete cloned image.
Challenges in development
During the development, we encountered several issues, which caused it not to go as smoothly as we would have liked.
- IP address management.
Managing IP addresses is a crucial task that must be handled with care. In the prototype, the SSH handling was implemented using direct and hardcoded SSH shell commands. However, in the case of non-interactive shells, key authentication is recommended. Additionally, it is advisable to add the host to the known_hosts file to avoid interruptions. Nonetheless, due to the dynamic management of virtual machines' IP addresses, there is a possibility of doubling the entry for a particular IP, leading to errors. Therefore, we need to assign the known_hosts dynamically for a particular job to prevent such issues.
- Pure Swift solution.
Considering that, and the fact that hardcoded shell commands in Swift code aren't really elegant, we thought that it would be nice to use a dedicated Swift library and decided to go with Swift NIO. We resolved some issues but at the same time, introduced a couple of new ones like - for example - sometimes logs placed on stdout were transferred *after* the SSH channel was terminated due to the command finished execution - and, as we were basing on that output in the further work, the execution was randomly failing.
- Xcode version selection.
Because the Packer plugin was not an option for dynamic image building due to the time consumption, we decided to go with a single VM base with multiple Xcode versions preinstalled. We had to find a way for developers to specify the Xcode version they need in their gitlab-ci.yml - and we have come up with custom variables available to use in any project. MQVMRunner will then execute `xcode-select` on a cloned VM to set up the corresponding Xcode version.
And many, many more 🙂
Streamlining Project Migration and continuous integration for iOS Workflow with Mac Studios
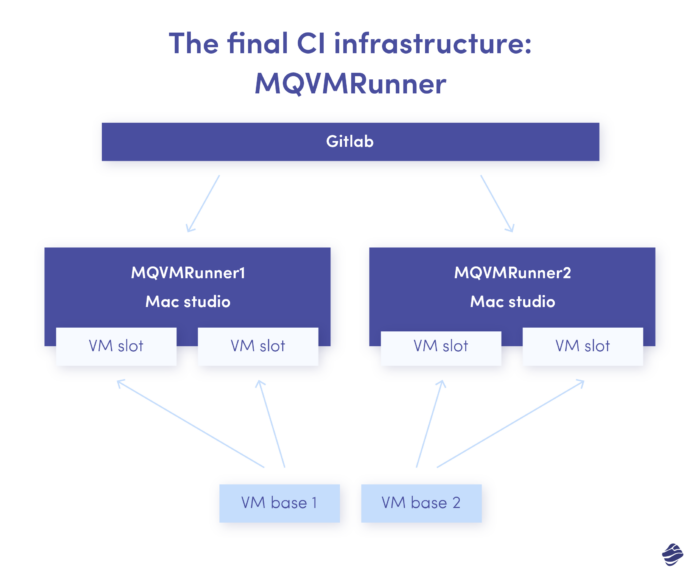
We had set that up on two new Mac Studios and begun migrating the projects. We wanted to make the migration process for our developers as transparent as possible. We couldn't make it entirely seamless, but eventually, we got to the point where they had to do only a couple of things in gitlab-ci.yml:
- The tags of runners: to use Mac Studios instead of Intels.
- The name of the image: optional parameter, introduced for future compatibility in case we need more than one base VM. Right now, it always defaults to the single base VM we have.
- The version of Xcode: optional parameter; if not provided, the newest version available will be used.
The tool got very good initial feedback, so we have decided to make it open-source. We have added an installation script to set up Gitlab Custom Runner and all the required actions and variables. Using our tool, you can set up your own GitLab runner in a matter of minutes - the only thing you need is tart and base VM on which the jobs will be executed.
The final continuous integration for iOS structure looks as follows:
3. Solution for efficient identity management
We have been struggling to find an efficient solution for managing our clients' signing identities. This was particularly challenging, as signing identity is highly confidential data that should not be stored in a non-secure place for any longer than necessary.
Additionally, we wanted to load these identities only during build time, without any cross-project solutions. This meant that the identity should not be accessible outside of the app (or build) sandbox. We have already addressed the latter issue by transitioning to VMs. However, we still needed to find a way to store and load the signing identity into the VM only for the build time.
Problems with Fastlane Match
At the time, we were still using the Fastlane match, which stores encrypted identities and provisions in a separate repository, loads them during the build process into a separate keychain instance, and removes that instance after the build.
This approach seems convenient, but it has some problems:
- Requires the entire Fastlane setup to work.
Fastlane is rubygem, and all the issues listed in the first chapter apply here.
- Repository checkout at build time.
We kept our identities in a separate repository that was checked out during the build process rather than the setup process. This meant that we had to establish separate access to the identity repository, not just for Gitlab, but for the specific runners, similar to how we would handle private third-party dependencies.
- Hard to manage outside of Match.
If you are utilizing Match for managing identities or provisioning, there is little to no need for manual intervention. Manually editing, decrypting, and encrypting profiles so that matches can still function with them later is tedious and time-consuming. Using Fastlane to carry out this process usually results in completely wiping out the application provisioning setup and creating a new one.
- Little hard to debug.
In case of any code signing problem, you may find it difficult to determine the identity and provisioning match that has just been installed, as you would need to decode them first.
- Security concerns.
Match accessed developer accounts using provided credentials to make changes on their behalf. Despite Fastlane being open source, some clients refused it due to security concerns.
- Last but not least, getting rid of Match would remove the biggest obstacle on our way to getting rid of Fastlane completely.
Our initial requirements were as follows:
- Load requires signing the identity from a secure place, preferably in non-plaintext form, and placing it in the keychain.
- That identity should be accessible by Xcode.
- Preferably, the identity password, keychain name, and keychain password variables should be settable for debugging purposes.
Match had everything we needed, but implementing Fastlane just to use Match seemed like an overkill, especially for cross-platform solutions with their own build system. We wanted something similar to Match, but without the heavy Ruby burden, it was carrying.
Creating the own solution
So we thought - let’s write that ourselves! We did that with MQVMRunner, so we could also do it here. We also have chosen Swift to do so, mainly because we could get a lot of necessary APIs for free using the Apple Security framework.
Of course, it also didn’t go as smoothly as expected.
- Security framework in place.
The easiest strategy was to call the bash commands as Fastlane does. However, having the Security framework available, we thought it would be more elegant to use for development.
- Lack of experience.
We weren’t very experienced with the Security framework for macOS, and it turned out it differed significantly from what we were used to on iOS. This has backfired on us in many cases where we weren’t aware of macOS limitations or assumed that it works the same as on iOS - most of those assumptions were wrong.
- Terrible documentation.
Apple Security framework’s documentation is, to put it mildly, humble. It’s a very old API dating back to the first versions of OSX, and sometimes, we had an impression that it hasn’t been updated since then. A big chunk of code is not documented, but we anticipated how it works by reading the source code. Fortunately for us, it’s open-source.
- Deprecations without replacements.
A good chunk of this framework is deprecated; Apple is trying to move away from the typical “macOS style” keychain (multiple keychains accessible by password) and implement the “iOS style” keychain (single keychain, synchronized via iCloud). So they deprecated it in macOS Yosemite back in 2014 but didn’t come up with any replacement for it in the past nine years - so, the only API available for us, for now, is deprecated because there is no new one yet.
We assumed that signing identities can be stored as base64 encoded strings in per-project Gitlab variables. It is safe, per-project based, and if set as a masked variable, it can be read and displayed in build logs as a non-plaintext.
So, we had the identity data. We only needed to put it into the keychain. Using Security API After a handful of attempts and a slugfest going through the Security framework documentation, we prepared a prototype of something that later became MQSwiftSign.
Learning macOS Security system, but the hard way
We had to gain a deep understanding of how the macOS keychain operates to develop our tool. This involved researching how the keychain manages items, their access and permissions, and the structure of keychain data. For instance, we discovered that the keychain is the only macOS file that the operating system ignores the ACL set. Additionally, we learned that ACL on specific keychain items are a plain text plist saved in a keychain file. We faced several challenges along the way, but we also learned a lot.
One significant challenge we encountered was prompts. Our tool was primarily designed to run on the CI iOS systems, which meant it had to be non-interactive. We couldn't ask users to confirm a password on the CI.
However, the macOS security system is well-designed, making it impossible to edit or read confidential information, including the signing identity, without explicit user permission. To access a resource without confirmation, the accessing program must be included in the resource's Access Control List. This is a strict requirement that no program can break, even Apple programs that come with the system. If any program needs to read or edit a keychain entry, the user must provide a keychain password to unlock it and, optionally, add it to the entry's ACL.
Overcoming User Permission Challenges
So, we had to find a way for Xcode to access an identity set up by our keychain without asking a user for permission using the password prompt. To do so, we can change the access control list of an item, but that also requires user permission - and, of course, it does. Otherwise, it would undermine the entire point of having the ACL. We have been trying to bypass that safeguard - we tried to achieve the same effect as with the `security set-key-partition-list` command.
After a deep dive into the framework documentation, we haven’t found any API that allows editing the ACL without prompting the user to provide a password. The closest thing we found is `SecKeychainItemSetAccess`, which triggers a UI prompt every time. Then we took another dive, but this time, into the best documentation, which is the source code itself. How did Apple implement it?
It turned out that - as could be expected - that they were using a private API. A method called `SecKeychainItemSetAccessWithPassword` does basically the same thing as `SecKeychainItemSetAccess`, but instead of prompting the user for a password, the password is provided as an argument to a function. Of course - as a private API, it isn’t listed in the documentation, but Apple lacks the documentation for such APIs as if they could not think of creating an app for personal or enterprise usage. As the tool was meant to be for internal use only, we didn’t hesitate to use the private API. The only thing that had to be done was to bridge the C method into Swift.
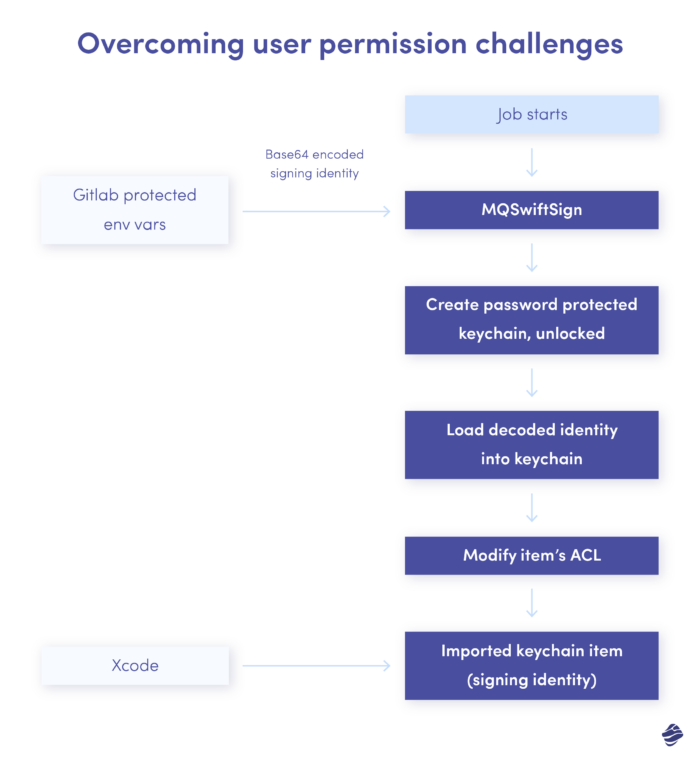
So, the final workflow of the prototype was as follows:
- Create the temporary unlocked keychain with the auto lock turned off.
- Get and decode the base64 encoded signing identity data from environmental variables (passed by Gitlab).
- Import the identity into the created keychain.
- Set proper access options for imported identity so Xcode and other tools can read it for codesign.
Further upgrades
The prototype was functioning well, so we identified a few additional features we would like to add to the tool. Our goal was to replace fastlane eventually; we have already implemented the `match` action. However, fastlane still offered two valuable features we didn't have yet - provisioning profile installation and export.plist creation.
Provisioning Profile Installation
The provisioning profile installation is pretty straightforward - it breaks down to extracting the profile UUID and copy the file to `~/Library/MobileDevice/Provisioning Profiles/` with UUID as a filename - and that’s enough for Xcode to properly see it. It's not rocket science to add to our tool a simple plugin to loop over the provided directory and do that for every .mobileprovision file it finds inside.
Export.plist Creation
The export.plist creation, however, is slightly trickier. To generate a proper IPA file, Xcode requires users to provide a plist file with specific information collected from various sources - the project file, entitlement plist, workspace settings, etc. The reason why Xcode can only collect that data through the distribution wizard but not through the CLI is unknown to me. However, we were to collect them using Swift APIs, having only project/workspace references and a small dose of knowledge on how the Xcode project file is built.
The result was better than expected, so we decided to add it as another plugin to our tool. We also released it as an open source project for a wider audience. Right now, MQSwiftSign is a multipurpose tool that can successfully be used as a replacement for basic fastlane actions required for building and distributing your iOS application and we use it across every our project in Miquido.
Final Thoughts: The Success
Switching from Intel to iOS ARM architecture was a challenging task. We faced numerous obstacles and spent significant time developing tools due to a lack of documentation. However, we ultimately established a robust system:
- Two runners to manage instead of nine;
- Running software that is entirely under our control, without a ton of overhead in the form of rubygems - we were able to get rid of fastlane or any 3rd party software in our build configurations;
- A LOT of knowledge and understanding of things we usually don’t pay attention to - like macOS system security and Security framework itself, an actual Xcode project structure, and many, many more.
I would gladly encourage you - If you are struggling with setting up your GitLab runner for iOS builds, try our MQVMRunner. If you need help with building and distributing your app using a single tool and do not want to rely on the rubygems, try out MQSwiftSign. Works for me, may also work for you!

